Where do I begin? Do I start with the tearing up of the lawn in the formal English garden to put in raised beds? Do I tell of the conversations where we dream of a not-so-urban farm? I guess I start with the text message.
July 12, 5:43pm
I received a text from the S.O. asking if we wanted to inherit three chickens that belong to The Kid. The hens were living on a horse ranch south of town, but the owner of the ranch no longer wanted to deal with chickens, so there was a mad dash to home the girls.
My response "Okay." Of course I wanted chickens. I have wanted chickens ever since I gave my hens to my neighbors when I moved to Indiana over two years ago. But I know the daily work and the overall expense that raising chickens entails. I know the early morning chores. I know the odds of breaking even after spending hundreds on a coop, food, and other supplies. I also know the entertainment value of watching chickens do chickeny things, not to mention the joy of collecting the eggs ("hey, we made food!").
"We need a coop with a run." I texted. "But, yeah!"
During dinner, we compiled a list of everything we would need for the chickens. A secure coop with a secure run, waterer, feeder, bedding, food, hardware cloth. I sketched out ideas for the perfect coop, but we had one in mind that we had seen at Coastal Farm and Ranch earlier this year.
We woke up early and drove to Coastal to pick up supplies for the ladies. The coop we wanted was gone. The others were outrageously expensive and cheaply made. All of the locks would need to be replaced and the coops needed to be predator-proofed. Fortunately, the dog houses were right near the coops, and there was one that was just under $100. With a few mods, it could be the perfect hen house for the girls. We grabbed some hardware cloth and a waterer and headed home to start the Extreme Coop Makeover.
When the S.O. went to the local hardware store for hinges, locks, screws, and wood, I swung by the Urban Farm Store for the rest of the
supplies: Portland Layer, a metal feeding trough, oyster shell and grit. We finished the coop around 9pm. We were exhausted and the hens were relieved to not have to spend the night in the dog crate.
Enjoy the pics below, but this isn't the end of the story. Remember, I drew what I thought
would be the perfect coop for our backyard farm. This coop was a
wonderful start, but in order to open and shut the door and reach the
food and water, the pen had to be dragged to and fro. Not an easy task should there only be one person around to care for the girls (such as a house/pet sitter) and this coop had to be easy.
 | |||
| The girls in the dog kennel, on the ride to the big city. |
 |
| One plank was removed from each side panel, to allow airflow through the coop. |
 |
| Hardware cloth was stapled to the inside of the side panel. |
 |
| And voila! One side wall of the coop is ready. |
 |
| View of side panel and front of coop. |
 |
| All the walls are up. Time to put in a floor. |
 |
| 1/2" hardware cloth was attached to the bottom, using a side plank for support. |
 |
The coop came with 3 floor panels.
We used one for the floor under the
nest box and one for the door.
|
 |
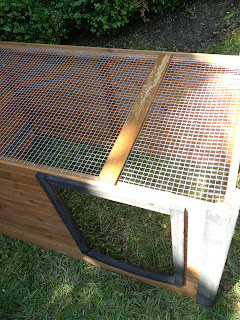
| The roof was attached with hinges along the front wall, so the inside of the coop can be easily accessed for eggs and cleaning. |
 |
| I later switched the door hinge so it swings from the top. |
 |
| Here comes the run. Most of the wood came from scrap in the basement. |
 |
| The (almost) finished coop and run. |


No comments:
Post a Comment